Product Design
Yearly Goal: To develop a toy that would be able to teach a specific skill, and entertain its users.
Process Journal Week 1
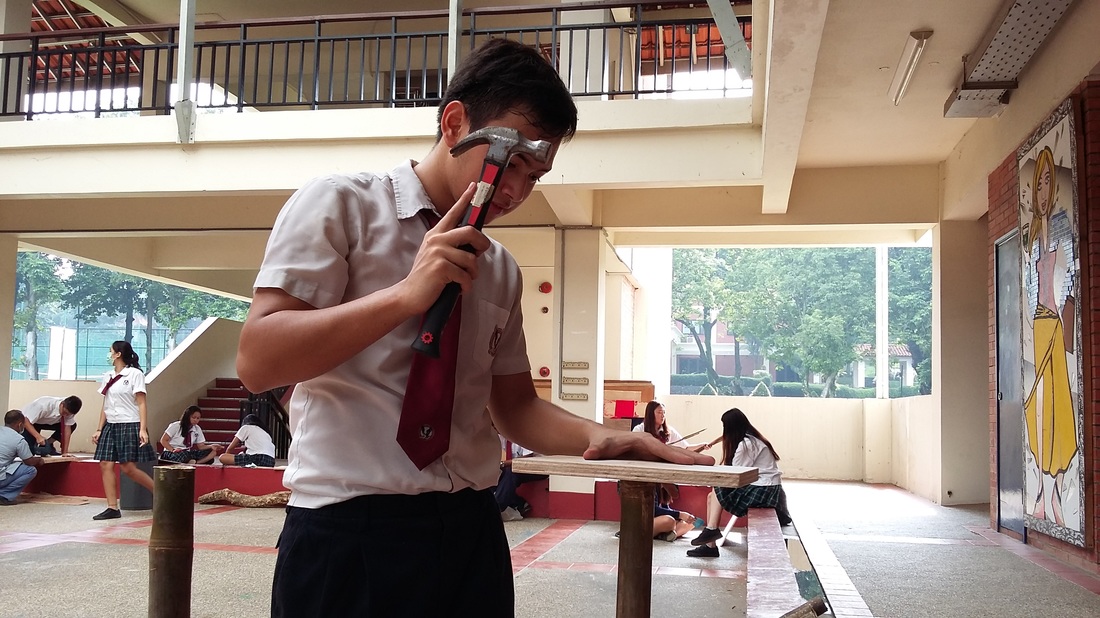
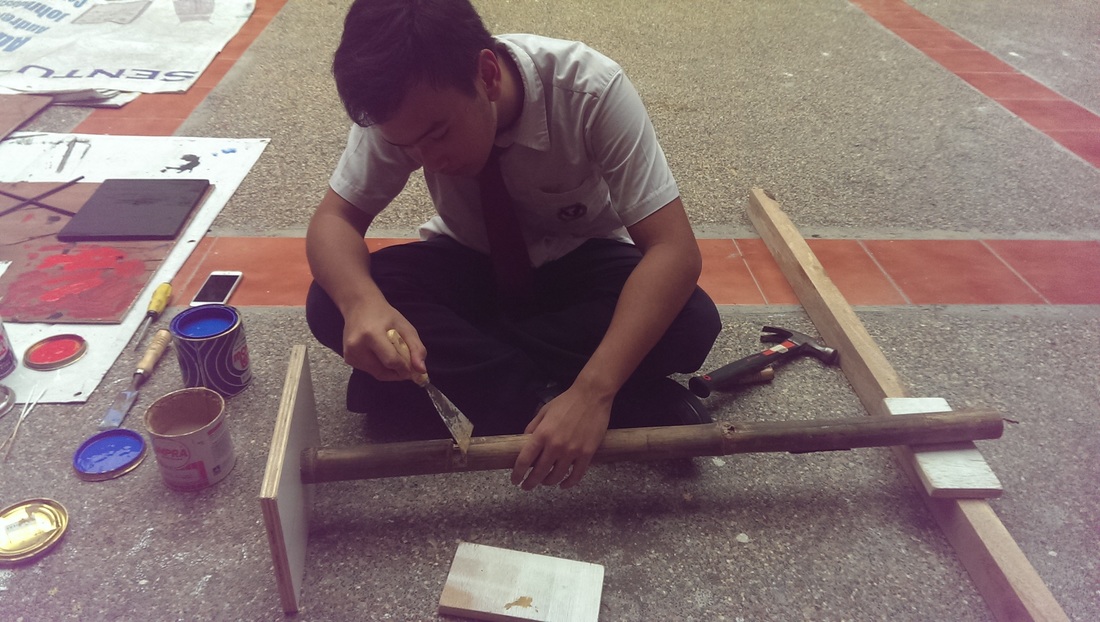
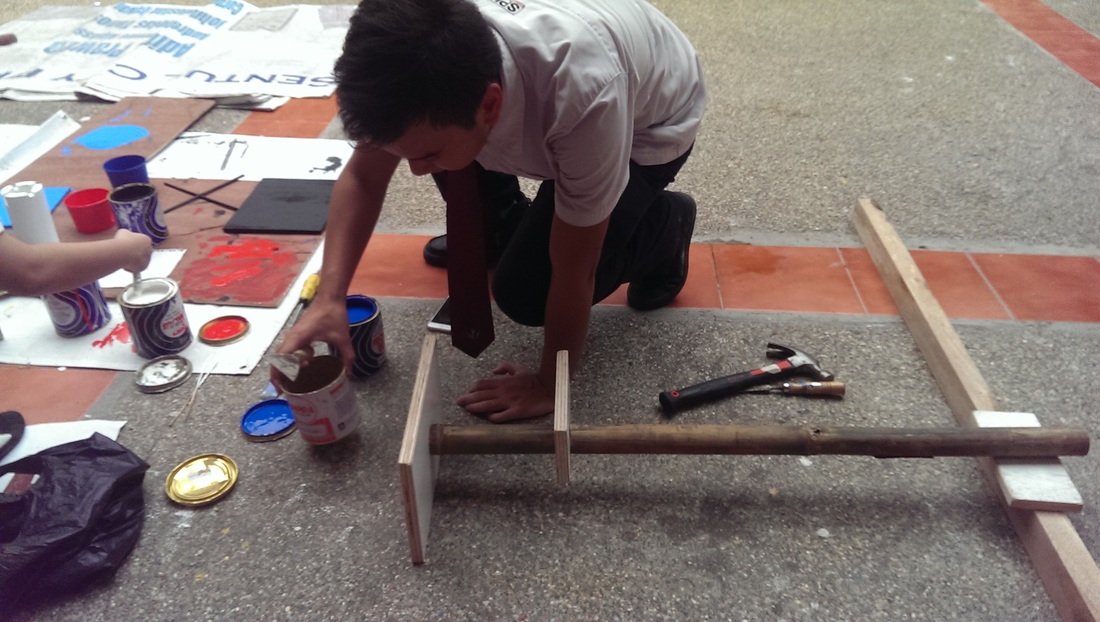
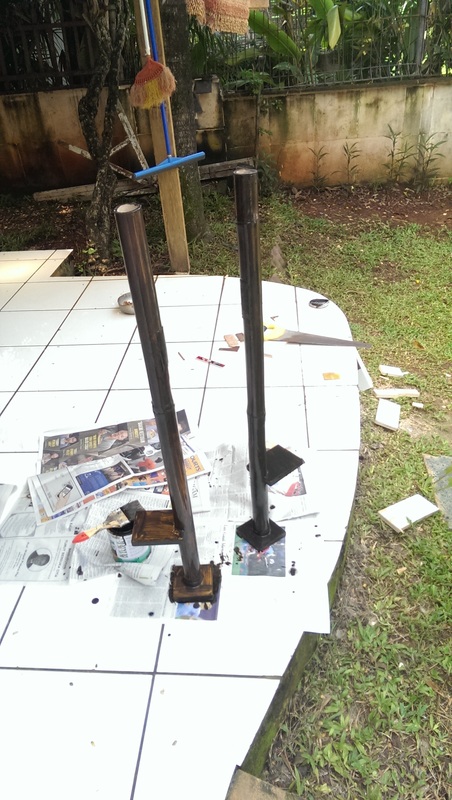
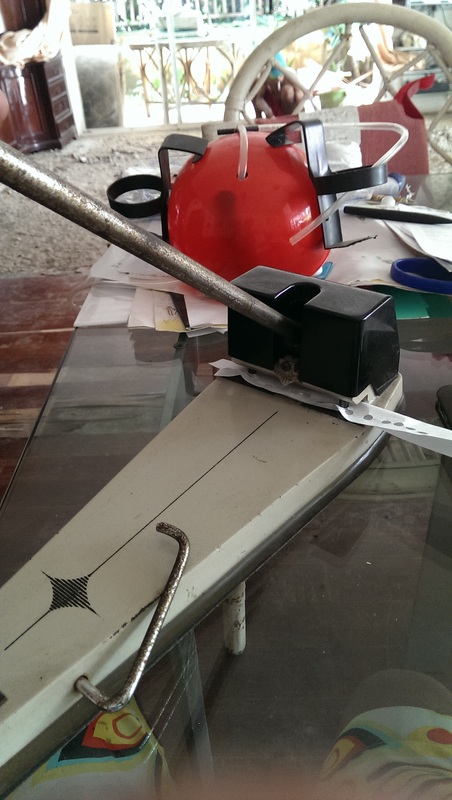
This week in Product Design class I have officially began with construction of my modified traditional toy, the Egrang. I have started with the first steps, which are to finish and make ready the main pieces of the traditional toy. Those consist out of the foot pieces, the basin, the poles, and the rubber grips. I had planned to create the main pieces first, in order to make it easier for me to construct and put the Egrang together in the Second Week.
I have so far though been able to finish up most pieces that I had planned to finish, such as the wooden basin, foot piece, and poles. However wasn't able to finish the rubber grips, as first of I have forgot the materials at home, and also had no time to finish them due to the fact that I had difficulty to finish the basins and foot pieces. This was caused due to me having difficulty cutting through my wood, because of the saw that I was using. That was apparently old, and a bit rusted. Making it not cut the wood smoothly, and usually hanging stuck in the wood, while I try to cut it. This made it ideal for me to use better tools next time, in order to increase my work effectiveness. I improved this by using tools that I had at home, like my handy man's saw, that was still sharp. Making it easier for me to cut through the wood, without having difficulty facing the problem with it being stuck in it. This helped me to also cut the pieces out more accordingly, and also increased my work efficiency. Having less time to take to finish making the foot pieces, and basin. As well as sanding them.
Though the saw was a big problem for me to work at school, I soon realized that I faced another problems, which was the wood. As the wood was mainly recycled, I noticed that it was of very poor quality, and that I had to re-make with better quality wood. This resulted in me having to cut the same pieces I had to cut at school, at home. In order not to be behind schedule. As I made the pieces at home, I also had better tools and equipment, with better materials to work with. Making it easier for me to cut through the material, as well as increasing the quality of my product as well. As I made the pieces with better quality wood.
In the end of the week I have been successful in preparing all the pieces for the next step, which requires me to put the pieces together, in order to construct the Egrang. These pieces require the wooden basin, wooden foot pieces, poles, and rubber grip Though the rubber material is already provided. I still have to cut it in order to form the grips. However with the materials ready I am able to proceed to the next step. This step requires me to mainly use nails and a hammer to put the pieces together tightly, so that the toy doesn't fall apart, and cause danger for the customer.
Though I have not modified the sequence of my planning, by skipping a step, or adding a step to the plan. I did make some modification to my initial design in terms of measurements. This was done in order for the measurements to be more appropriate for the audience. As I noticed during the process of making my pieces, that some of the pieces were to big of size, making them to big for the customer to use. This resulted in me decreasing the initial sizes of the foot pieces, wooden basins, and bamboo poles. By decreasing the total area, diameter, or the lengths, and widths. I have done this by decreasing the initial diameter of the bamboo poles. From 10cm diameter to 6-7cm. This would make it easier for the hands of the preschooler to have a grip on it, by being able to hold the bamboo pole, rather then just a piece of a too big bamboo pole. I also decreased the length and width of the wooden basin from the length 40 cm to 30 cm, and the width from 30 to 20 cm. This would also make it not to big for the bamboo pole, making it cover a smaller surface area, as well as making it lighter for the preschooler to lift. I have also decreased the foot piece size from the length of 30 cm to 20 cm and the width of 20 cm to 10 cm. Suiting more with the foot size of a preschooler, making the piece more comfortable to stand on for a preschooler. I have not changed the rubber grips measurements, as I believe that those are the only measurements that were appropriate for my target audience, resulting in no need for modifications. By making the modifications on the other pieces, I hope it to bring more comfort to my customer. With a decrease of weight due to a decrease of size, and an easier grip. Making it easier for them to use the Egrang, hoping that these modifications would make the toy more appropriate with their requirements.
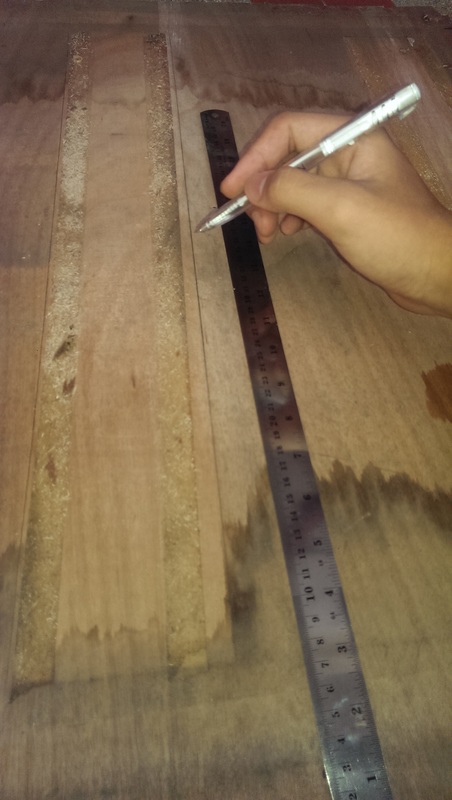
Measuring the wood
|
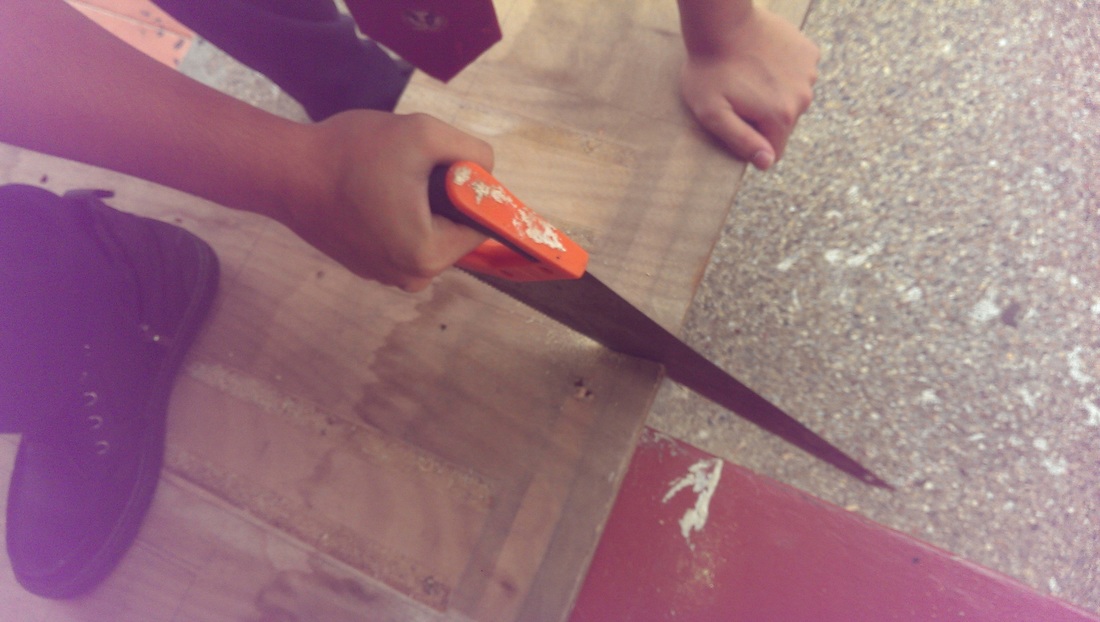
Me cutting the wood, to create a foot piece
|
Process Journal Week 2
This week in product design class I have begun with putting the Egrang's main pieces together. That included to nail the wooden basins to the bamboo poles, to create easier balance for the customer when using the Egrang, due to the large surface area of the wooden basin. Creating then glueing and pasting the rubber grips to the bamboo poles, to give the customer extra grip to the poles. As well as cutting out a small piece of the bamboo poles to make it big enough for the foot pieces to be inserted inside, so that the customer can stand on the Egrang. By having the Egrang technically finished with all of its pieces connected to each other, I would be ready to proceed to the third week, in where I would paint the Egrang to make it more aesthetically attractive for the customer.
I have so far been able to finish most parts of the Egrang, by being able to attach its poles to the basins, and the rubber grips to the poles. Before starting to attach any of the pieces, I had to measure them, in order to know that they were of the right sizes, and in the case of the wooden basin to know where the center is so that I could attach it properly to the bamboo pole. That would be done by nailing it. Though there was a lot of success attaching most pieces. I faced difficulty in attaching the foot pieces to the bamboo poles. As there was no clear and good area to place nails to attach them to the bamboo pole, and also due to the fact that I forgot to bring the corner braces I would use to attach the two pieces together. With the corner brace, I am able to attach the foot piece from the bottom to the bamboo pole, using two nails positioned perpendicular to another. This allows the foot piece to be attached properly to the bamboo pole, as it is both connected by the nails to both pieces. Despite the fact that I wasn't able to do this crucial step this week, due to the fact that I didn't have the corner braces ready, that prevented me to complete all things necessary for the week. I would do it on the third week along with painting the Egrang, where I would have the corner braces ready, in order to keep up with the schedule.
One of the biggest mistakes I have done this week though came to when I decided to cut the bamboo poles in order to create the hole for the foot piece to fit in. Though the cutting was not that difficult, and done with ease. It was after the cutting was finished that I had discovered my big mistake. That was when I realized that I cut on the wrong side of the pole, with the foot pieces facing a different direction then the wooden basin. This resulted in me having to fix this mistake quickly, so that the product could eventually function. Rather then cutting another hole in the bamboo that would make the bamboo unstable and dangerous for use. I decided to detach the wooden basin by hammering them hard with a hammer covered by a cloth. In order to nail the wooden basin back again, so that both the foot piece and basin would face the same direction in order for the Egrang to function properly later on. Attaching the basin back again wasn't so hard. As I had already measured the center from before, however at the same time costed me a lot of valuable time. As I had to redo a step that was suppose to be done, but was hindered due to my silly mistake not paying to much attention to where I was cutting. I hope to improve this next time when I am cutting by not being to overjoyed with my progress, and focusing more on what is happening, so that everything could be done more accordingly.
The other struggle I faced this week was in attaching the foot pieces, as though I had cut the pieces accordingly to measurements, the cutting wasn't done to properly and straight. Making the holes in the bamboo not the straight as well, which makes the foot pieces fit in not to accordingly and hang a bit out. I would fix this mistake by trying to fill the unequal edges of the bamboo with wood filler in order to straighten it more. So that the foot piece could slide in to the hole more smoothly, and be attached straight, before being attached with the corner braces. With the more straightened edges of the bamboo poles hole. The foot piece would be attached and have a better grip with the bamboo. Making it safer to function for the use of the customer, as if it wouldn't the foot piece could hang a bit degrees downwards do to no wood filler being attached to the unequal edge of the bamboo at the bottom part of the bamboo, which would consequently result in the customer to slide of the foot piece and fall.
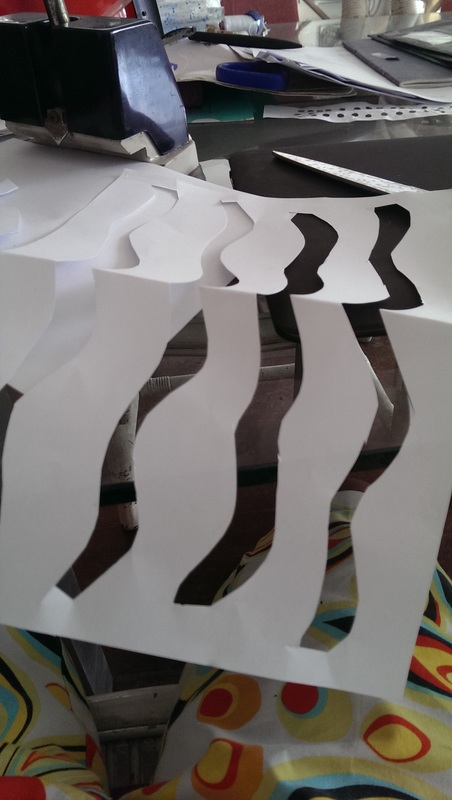
The next step of my plan is to paint the Egrang, which would be done with yellow, green, white, red, and black colors. Colors usually used by native tribes in Kalimantan. This would make the toy also look more interesting to look at with the colors, then if it had no colors, which would make it look more like just wood. I would do this step with using stencil paper to color the shapes out neatly, as well as using big brushes to color the background with black before the stenciling. However I must first require to complete the steps from the second week to have the Egrang technically ready and complete. As it would then be easier for me to paint it, and have no unpainted pieces, which weren't painted because I didn't have them yet during the time when I was painting the toy.
I have so far been able to finish most parts of the Egrang, by being able to attach its poles to the basins, and the rubber grips to the poles. Before starting to attach any of the pieces, I had to measure them, in order to know that they were of the right sizes, and in the case of the wooden basin to know where the center is so that I could attach it properly to the bamboo pole. That would be done by nailing it. Though there was a lot of success attaching most pieces. I faced difficulty in attaching the foot pieces to the bamboo poles. As there was no clear and good area to place nails to attach them to the bamboo pole, and also due to the fact that I forgot to bring the corner braces I would use to attach the two pieces together. With the corner brace, I am able to attach the foot piece from the bottom to the bamboo pole, using two nails positioned perpendicular to another. This allows the foot piece to be attached properly to the bamboo pole, as it is both connected by the nails to both pieces. Despite the fact that I wasn't able to do this crucial step this week, due to the fact that I didn't have the corner braces ready, that prevented me to complete all things necessary for the week. I would do it on the third week along with painting the Egrang, where I would have the corner braces ready, in order to keep up with the schedule.
One of the biggest mistakes I have done this week though came to when I decided to cut the bamboo poles in order to create the hole for the foot piece to fit in. Though the cutting was not that difficult, and done with ease. It was after the cutting was finished that I had discovered my big mistake. That was when I realized that I cut on the wrong side of the pole, with the foot pieces facing a different direction then the wooden basin. This resulted in me having to fix this mistake quickly, so that the product could eventually function. Rather then cutting another hole in the bamboo that would make the bamboo unstable and dangerous for use. I decided to detach the wooden basin by hammering them hard with a hammer covered by a cloth. In order to nail the wooden basin back again, so that both the foot piece and basin would face the same direction in order for the Egrang to function properly later on. Attaching the basin back again wasn't so hard. As I had already measured the center from before, however at the same time costed me a lot of valuable time. As I had to redo a step that was suppose to be done, but was hindered due to my silly mistake not paying to much attention to where I was cutting. I hope to improve this next time when I am cutting by not being to overjoyed with my progress, and focusing more on what is happening, so that everything could be done more accordingly.
The other struggle I faced this week was in attaching the foot pieces, as though I had cut the pieces accordingly to measurements, the cutting wasn't done to properly and straight. Making the holes in the bamboo not the straight as well, which makes the foot pieces fit in not to accordingly and hang a bit out. I would fix this mistake by trying to fill the unequal edges of the bamboo with wood filler in order to straighten it more. So that the foot piece could slide in to the hole more smoothly, and be attached straight, before being attached with the corner braces. With the more straightened edges of the bamboo poles hole. The foot piece would be attached and have a better grip with the bamboo. Making it safer to function for the use of the customer, as if it wouldn't the foot piece could hang a bit degrees downwards do to no wood filler being attached to the unequal edge of the bamboo at the bottom part of the bamboo, which would consequently result in the customer to slide of the foot piece and fall.
The next step of my plan is to paint the Egrang, which would be done with yellow, green, white, red, and black colors. Colors usually used by native tribes in Kalimantan. This would make the toy also look more interesting to look at with the colors, then if it had no colors, which would make it look more like just wood. I would do this step with using stencil paper to color the shapes out neatly, as well as using big brushes to color the background with black before the stenciling. However I must first require to complete the steps from the second week to have the Egrang technically ready and complete. As it would then be easier for me to paint it, and have no unpainted pieces, which weren't painted because I didn't have them yet during the time when I was painting the toy.
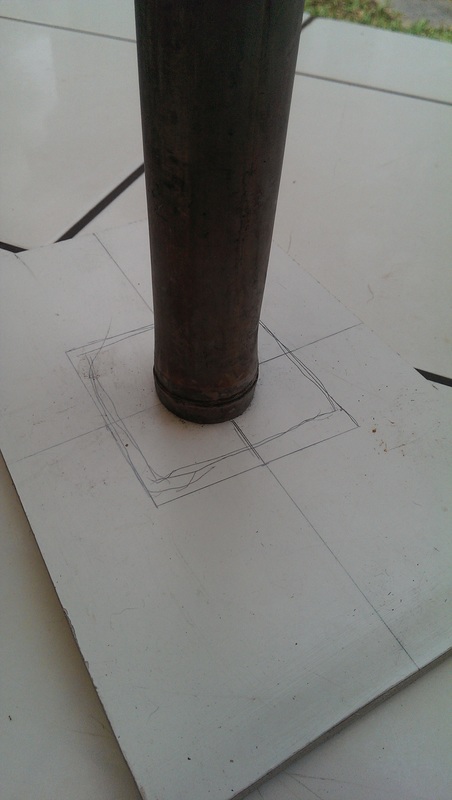
Finding the center of the Basin for the area where I would connect it the bamboo pole.
|
After finding the center, I place the bamboo pole on the basin to trace its covered area. That would indicate the range where I could place the nails.
|
Using nails I attach the basins with the bamboo poles.
|
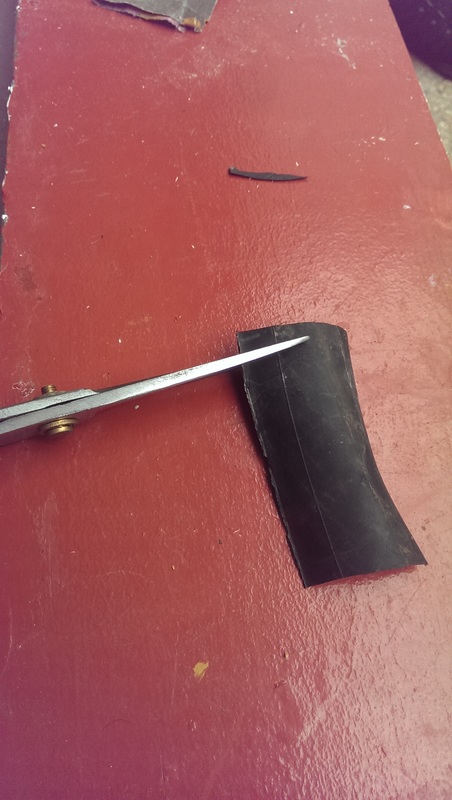
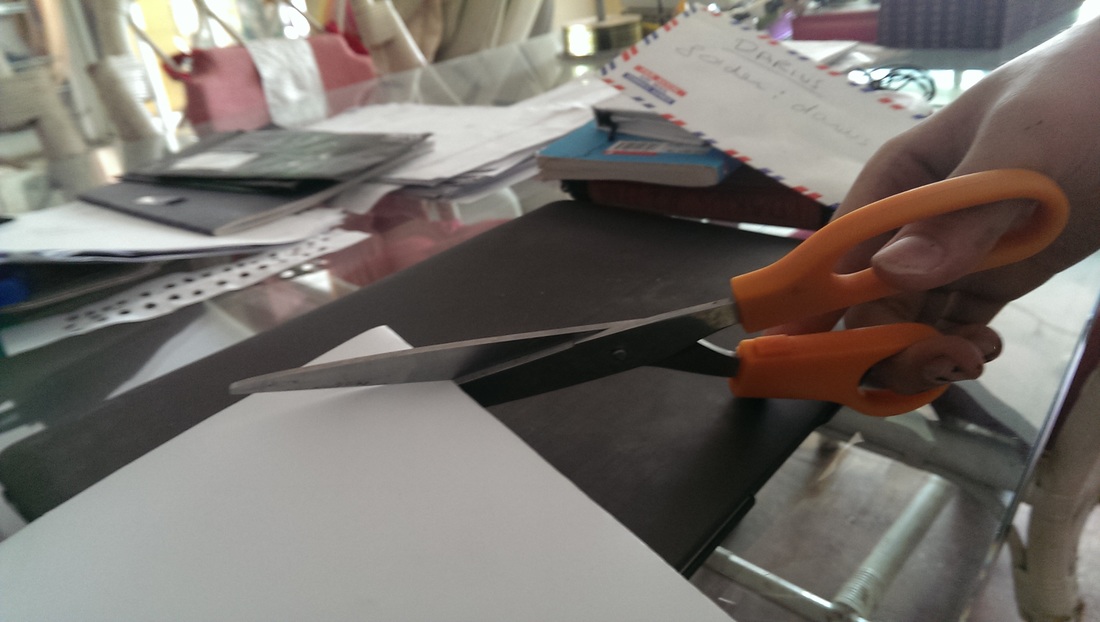
Cutting out the rubber grips.
|
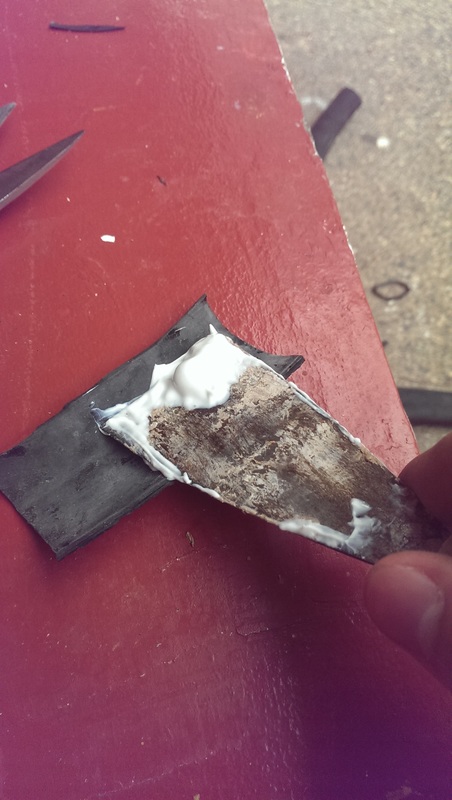
Pasting glue on the grips.
|
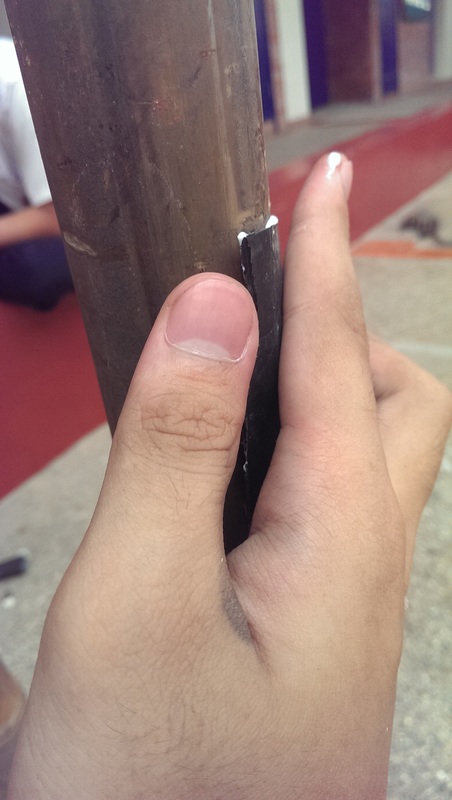
Pasting the grips to the bamboo pole.
|
Using wood filler to equalize the unequal cutting of the bamboo.
|
Placing the foot piece to the bamboo pole, after using the wood filler.
|
Process Journal Week 3
This week in design technology class, I continued constructing my Egrang by finishing its last main step, which is to paint the Egrang. I would paint the Egrang overall in black and use different colors of yellow, green, red, and white to decorate it using different patterns and stencil paper. Besides painting the Egrang, I would first have to complete several steps from the previous week, which is to attach the foot piece to the bamboo pole, and also to sand the bamboo. As with all piece of the Egrang complete. It would be easier for me to paint, with nothing else to worry about.
Though I have not faced any struggles through the past week in producing the Egrang, as the painting of it wasn’t too difficult. Using basic paint and stencil skills to decorate the Egrang. Those include cutting out the stencil paper, painting on the stencil paper, and drying it. I did face difficulty in attaching the wooden foot piece to the Egrang, as all the methods I have insisted in my original plan failed. That was to attach the foot piece using a corner brace, and using wood filler to fill in the hole that was cut to big for the foot piece to be placed into. Both the corner brace and wood filler have failed. As I noticed that the nails I would use to attach the foot piece to the bamboo pole using the corner brace were too long, and would have penetrated out of the other side of the foot piece. Which isn’t too good as the nail would stick out of the part where the foot would preschoolers foot would be placed, in which the exposure of the sharp point of the nail could cause injury and harm. While the corner brace would also not provide a lot of grip, as it would be attached from the bottom of the foot piece. Leaving the sides of it still free to wobble around as the Egrang is in use through walking with it. This therefore resulted in me to think over the problem, and come with more ideal solutions to attach the foot piece in a better manner.
The wood filler didn’t work well as though it was able to fill in the hole, it didn’t provide good support for the foot piece. As the weight of the wood under the pressure of a child on it, would squeeze the wood filler, resulting in the support to bend and break. Also resulting in the foot piece not being able to be attached perpendicular to the bamboo pole, with it facing a few degrees downwards, as its supports are weak. This would make it more prone for the foot piece to detach of from the bamboo pole, or the preschooler to slip of from the foot piece as it angles a few degrees downwards. Therefore I had to consider using a different material to find a solution to the problem.
To overcome the problems I faced to attach the foot piece to the bamboo pole, I started to get ideas from my family’s handy man that is an excellent carpenter, and could come with any solution for any carpentry problems. He inspired me to use a hammer and a chisel to make small wooden planks that could fit in the holes of the too big cut in the bamboo, and use these wooden planks as support rather then wood filler. This was an effective solution to the problem, as the wood was a good and strong support, and fitted in the hole perfectly. I made these planks through cutting them out of a thick piece of plywood, using a hammer and a chisel. He also gave me the idea to nail the foot pieces from the sides, through the side of the bamboo. Providing a better grip as both the left and right side of the foot piece were attached. Not allowing them to wobble when used in motion by the preschoolers. This was also a safer method to attach the foot piece, as not nail part would be exposed to the preschooler. Through being able to attach the foot pieces properly, by providing good and strong supports for the foot pieces to attach stably, and a nails at the left and right side to get a good grip. The Egrang has become a better and safer toy to use, with no exposure of nails to the preschoolers feet, as well as wobbly and loosely attached foot pieces.
The next step in my plan would be to evaluate the product, through analyzing its details and overall function. Though this has been done through the last few weeks as each step was completed. This time I would be able to evaluate even better. With the product technically being complete. Allowing me to analyze and evaluate it as a whole, and not piece by piece as I have done in the week before.
Though there have been no modifications made to the way I paint the product. I have made several modifications once again to the measurements of the pieces. As it was suggested by my mother, who knows this toy well from her childhood, that the foot pieces as well as the basin were still too big in terms of measurements. Making it difficult for the preschooler to use, as it the pieces would be too heavy for them to lift, making it difficult to move and walk with the Egrang as suppose to, resulting in the product not to function. In response to the problem my mother pointed out, I decided to decrease the measurements of the Egrang’s wooden basin from 30cm length and 20cm width to 5cm length and 5cm width. This would make the basins smaller, and lighter. Making it easier for the preschoolers to lift, as well as more flexible to use, as the pieces would be smaller. Allowing sharper and quicker turns with less weight to lift the entire piece. I also decreased the foot pieces length from 20cm to 12.5 cm. While the width remained 10cm. As the width of the feet would still remain the same, while the length was way to long for the feet of the preschoolers, making it uncomfortable for the preschooler to use with their small feet. These modifications were made in order to make the product more suitable and appropriate for the customer. As through the right measurements, the Egrang would be lighter making it easier to lift to poles, and much easier to use. Making the overall toy to function properly and suit the customer’s needs.
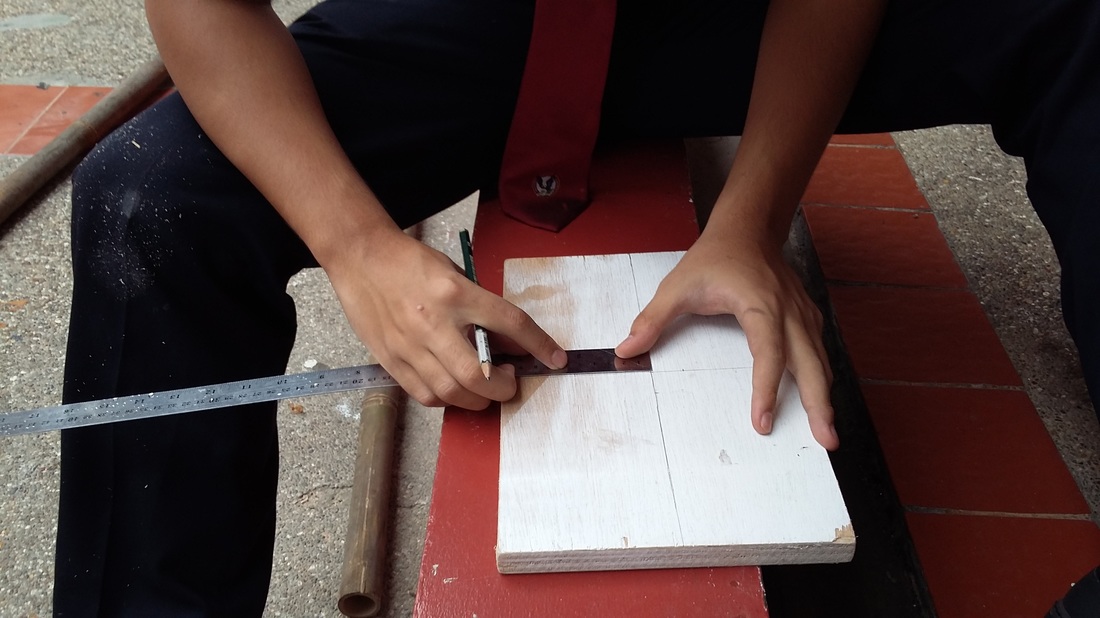
Making the new measurements for the basin.

New measurements for the foot piece, see the line on the wooden piece.
Painting the bamboo poles.
Cutting out the shapes for the stencil paper.
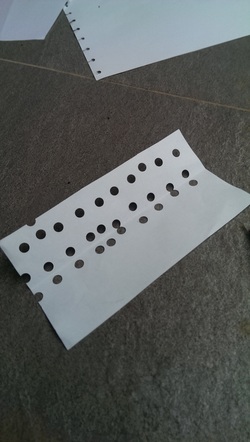
Holes stencil paper.
|
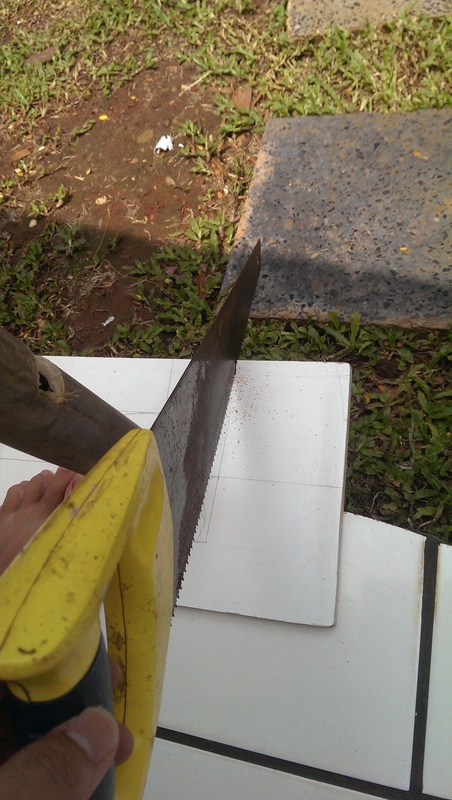
Cutting out the measurements using saw, decreasing the overall size of the basin.
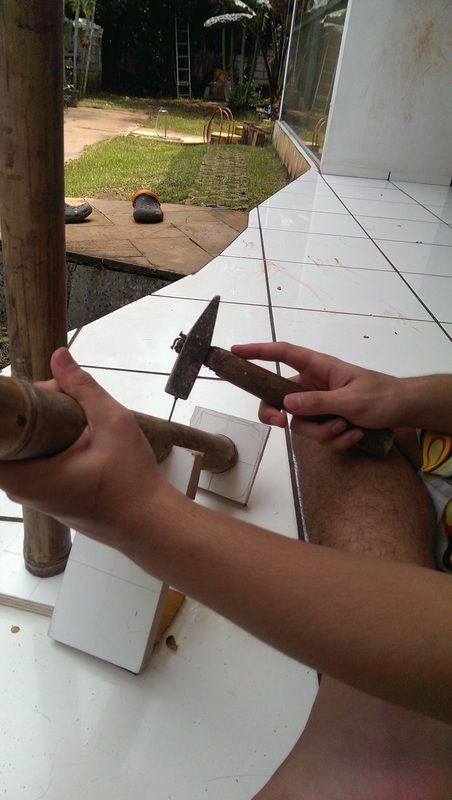
Nailing the foot piece to the bamboo pole.
Finished painting, and waiting for the poles to dry.
Wobbly line stencil paper complete.
|
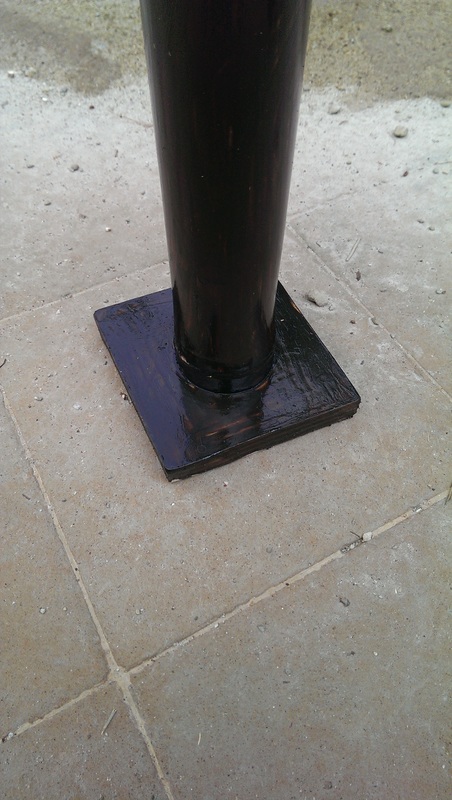
The new basin, after painted black.
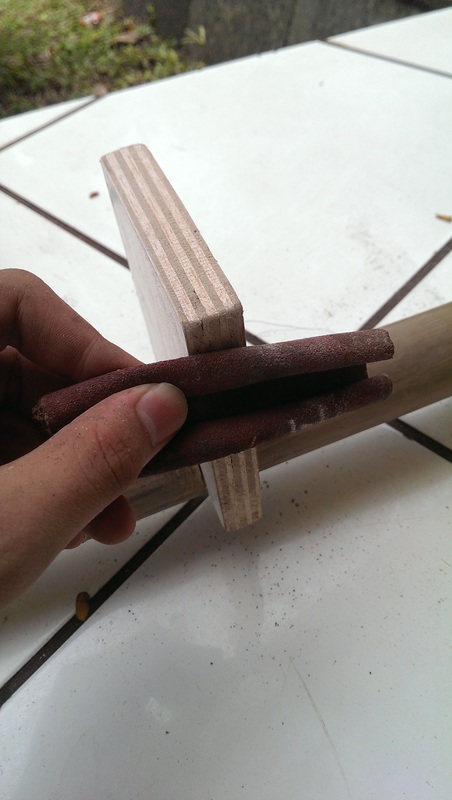
Sanding the foot piece, basin, and bamboo.
Making holes in to create stencil paper.
|
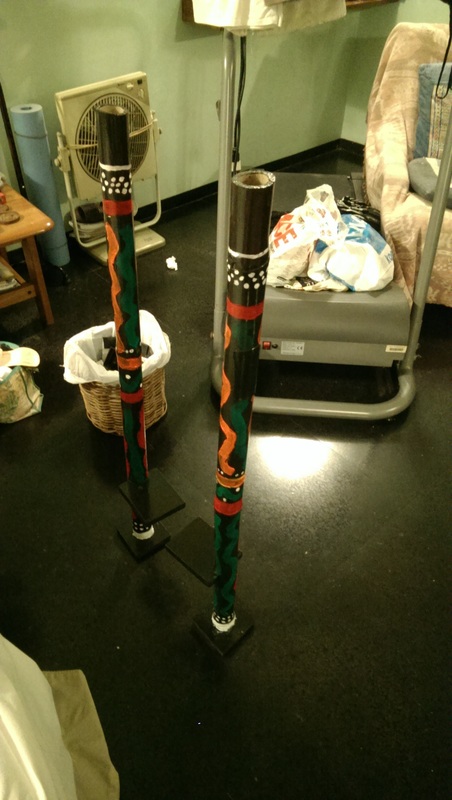
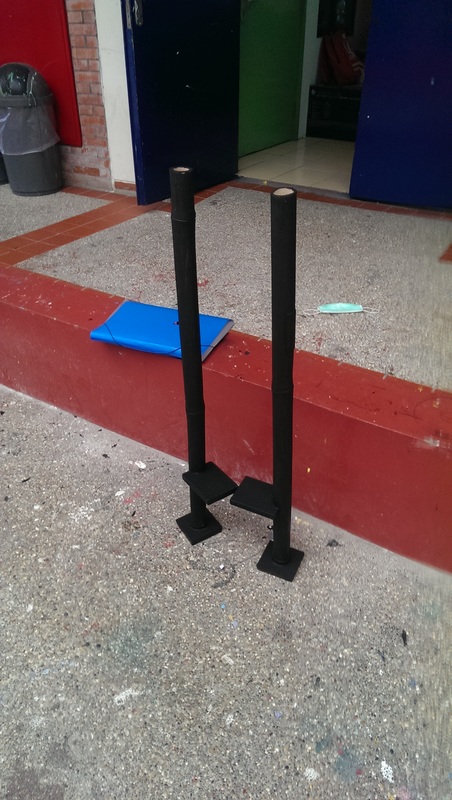
The Egrang is complete and ready for evaluation!
Process Journal Week 4
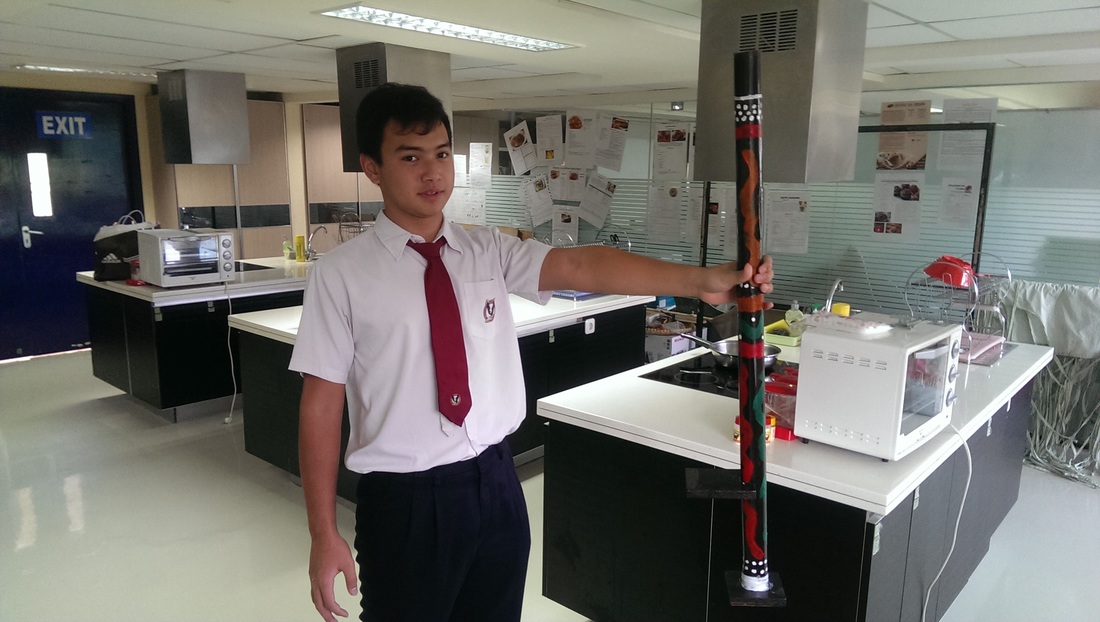
This week in design technology class I started reviewing and evaluating the Egrang that I had completed during the third week of construction. During this week I used different testing methods that I used in order to determine if it meets my design specs. Some of these testing methods like the pressure test, durability test, paint test, choking test, and measuring test. In order for me to determine if the product could be durable and withstand falling and banging caused by the children, as well as that it couldn’t be choked by them and contains hazardous and dangerous materials.
Though I have finished my product in the previous week, I had to repaint the entire toy again, after I didn’t use my stencil paper properly, and used paint that contained hazardous properties. This resulted me into sanding the surface of the toy, in order for the paint to be scratched of later, so that I could repaint the entire toy using stencil paper afterwards. This was by far one of the most annoying procedures to happen, as I had to redo the entire progress I have made during the third week. That could have been prevented if I had used the stencil paper properly, and checked the paint I used to see if any hazardous properties were included.
One of the few difficulties I have faced this week during the repainting and redecorating process, was using the stencil paper. Thinking that it was easy at first, I soon realized that applying stencil paper to a round circular surface is completely different story to when replying to a flat surface. This was caused as the paper didn’t completely stick to the surface, and left several spaces in the paper for the paint to drip out, resulting in it not to be applied neatly, and having to fix it by painting it over with the background color, black, in order to restart. This problem was made more difficult with the paint usually being watery, that resulted in the dripping and fill in the spaces that were provided by the stencil paper having difficulty to be applied on the bamboo poles. Increasing the risk for it to be applied not neatly.
In order to respond to this problem, I tried to stick the paper using double-sided tape very tightly, so that it prevents spaces to be created. I also cut the stencil paper to a smaller size, rather then using A4 size. As that allowed it to be applied and stick more easily to the bamboo pole, rather then a whole A4 size paper, that I noticed had difficulty to be applied around the bamboo pole, as the surface isn’t always straight at all parts, resulting in spaces to be created. By making smaller slides of paper rather then the A4, I used it to compensate with the rough surface, preventing the spaces to be created. I also used drier paint then wet paint. Though dry paint would not be as smooth when painting then using wet paint. Being rougher when applied to the surface. It does decrease the chance of dripping. Making it more neater, and preventing paint spills to happen.
Week four is the last week for our construction, and therefore I would not do anything in the week that follows. Before week four ends I should be done with all of my Egrang, having it painted, stenciled, all parts attached, and tested using the testing methods. In order to have it ready to be introduced to the preschoolers who are my customers for the toy.
Throughout this week I have made several modifications to the plan concerning the stencil paper. Using small strips of stencil paper, then an entire A4 paper, in order to compensate with the rough surface I have noticed to exist on several parts of the bamboo pole. By using these small strips of stencil paper, it would decrease space created under the paper when applied with an A4 paper, due to the rough surface. Preventing the space to be created using the modified smaller strips of stencil paper. I would prevent and decrease the risk of paint spills, making the product look more neatly, and of better quality.
Durability test demonstrated through dropping the object from a certain height. (50cm)
|

Weight test of the toy.
|
What remains of the old Egrang's coating, and skin :'(
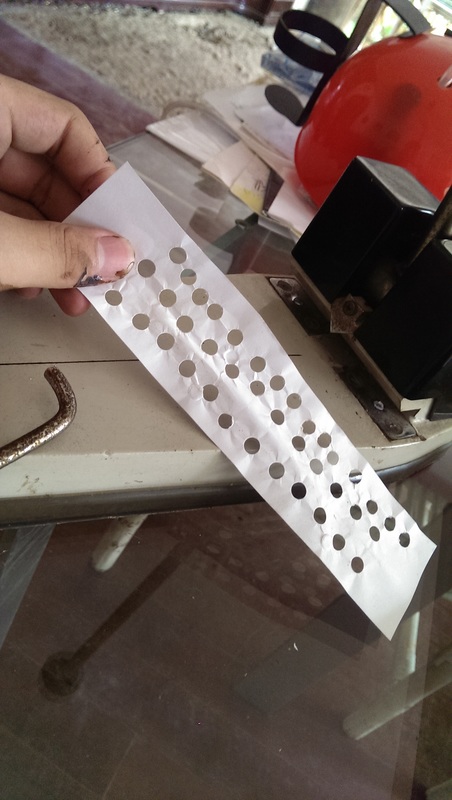
Finished stencil paper
|
New painted Egrang, after sanding of the old skin :(
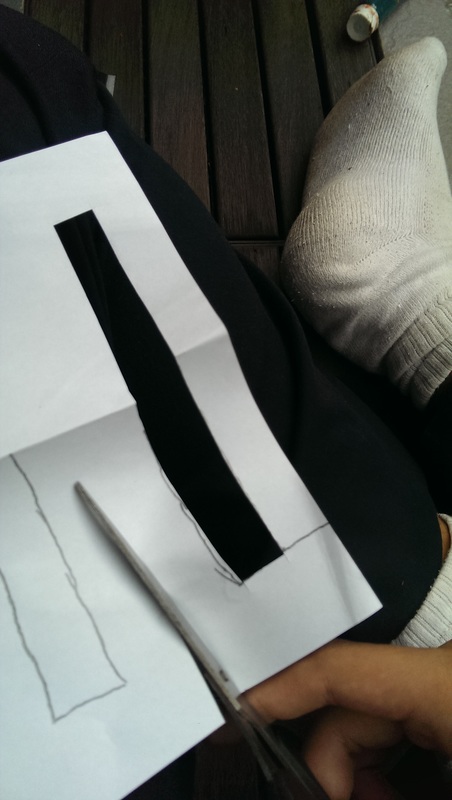
Making the stencil paper.
|
